wtfplay-live user manual
version 0.13, May 2022
Table Of Contents
- 1. Introduction
- 2. wtfplay-live
- 2.1. Supported processors and memory requirements
- 2.2. Supported sound devices
- 2.3. Native DSD playback with USB sound devices
- 2.4. Recommended BIOS settings
- 2.5. SATA storage devices
- 2.6. Supported file systems
- 2.7. Installation
- 2.8. Booting
- 2.9. Keyboard layout
- 2.10. Sound devices
- 2.11. Volume control
- 2.12. Access to local disks
- 2.13. Checking what disks are mounted
- 2.14. Rebooting and shutting down
- 2.15. Persistent configuration
- 3. The player: 'wtfplay'
- 3.1. Supported file formats
- 3.2. DSD playback
- 3.3. Playing music
- 3.4. Using command line
- 3.4.1. Starting and stopping 'wtfplay'
- 3.4.2. Playback navigation
- 3.4.3. Playing multiple files at once
- 3.4.4. Summary of the command line options
- 3.5. Using UI
- 3.5.1. Main screen
- 3.5.2. Filesystem browser
- 3.5.3. Playlist
- 3.5.4. Playback window
- 3.5.5. Complete list of key bindings
- 3.6. Playing playlist from the command line with 'wtfplaylist'
- 4. Advanced topics
- 4.1. Tuning the audio buffer size
- 4.2. Tuning the player process priority
- 4.3. Passing player parameters via 'wtfcui'
- 4.4. Disabling unwanted sound cards with 'snd'
- 5. 'wtfsetup' utility
1. Introduction
1.1. Overview
wtfplay-live is a small Linux distribution highly optimised for audio playback. What does that mean in practice?
-
no graphical mode
-
no network
-
runs completely from RAM
-
runs only a few really necessary processes
-
runs Linux kernel that is precisely tailored for audio
-
plays audio files from local storage
The core component of the distribution is wtfplay player. It is a command line driven program and is built purely with having sound quality as top priority.
Since Linux file system navigation requires a learning curve, there is also a small text based UI available. It is called wtfcui and offers simple and intuitive menu driven user interface.
1.2. A few words about this manual
In this manual you can find comprehensive information on how to play music on your PC with wtfplay-live.
The next section covers wtfplay-live in general. It includes essential information about the basic environment, sound interface naming and accessing local disks.
The third section covers wtfplay player. It starts by introducing the features of the player and continues with basic usage. It also describes how to use wtfcui.
The fourth section covers advanced topics such as tweaking the player’s parameters. Please feel encouraged to experiment with parameters. This may bring very rewarding results.
Finally, the last section describes a configuration tool that allows you to define default playback parameters. The tool is called wtfsetup.
2. wtfplay-live
2.1. Supported processors and memory requirements
The wtfplay-live runs on PC with processors compatible with Intel Core2 Duo. At the moment the following ISO images are available:
-
core2 - optimised for Intel Core2 Duo CPUs.
-
corei7 - optimised for Intel Core i3/5/7 CPUs.
-
corei7-avx - optimised for Intel Core i3/5/7 CPUs with AVX instruction set.
-
amda8 - optimised for AMD family 10 CPUs, including AMD A4/A6/A8 APUs.
-
amdbd1 - optimised for AMD Bulldozer 1 CPUs and newer.
In terms of memory, the distribution is extremely light. It requires less than 100MB of RAM for itself. All remaining RAM is used to load your music files. 2GB+ is the recommended RAM size.
2.2. Supported sound devices
The wtfplay-live relies on ALSA (Advanced Linux Sound Architecture, http://alsa-project.org) to play music. ALSA is the default sound subsystem in Linux kernel. wtfplay-live has been created with USB audio in mind. That is why it does not support all devices that are supported by ALSA.
Here are the USB devices that are supported:
-
USB audio devices compliant with UAC2 and UAC1 specifications. In particular wtfplay-live supports Amanero Combo384, XMOS xCORE-AUDIO based devices and C-Media CM6631(A) based devices.
-
Edirol UA-101 and UA-1000 USB interfaces.
-
Tascam US-122, US-224, US-428 and US-122L interfaces
-
Native Instrument USB audio devices.
-
TerraTec DMX 6Fire USB
-
M2Tech hiFace
Apart from USB devices wtfplay-live supports a small number of PCI devices. Those are:
-
sound cards based on Envy24HT/PT chips. This group includes: AMP AUDIO2000; M-Audio Revolution 5.1, 7.1, Audiophile 192; TerraTec Aureon 5.1 Sky, 7.1 Space/Universe, Phase 22/28; Onkyo SE-90PCI, SE-200PCI; AudioTrak Prodigy 192, 7.1 (HIFI/LT/XT), HD2; Hercules Fortissimo IV; ESI Juli@; Pontis MS300; EGO-SYS WaveTerminal 192M; Albatron K8X800 Pro II; Chaintech ZNF3-150/250, 9CJS, AV-710; Shuttle SN25P; Philips PSC724 Ultimate Edge.
-
RME sound cards: Digi32 (PRO), Digi32/8, Digi96, Digi96/8 (PRO/PAD/PST) and RME Hammerfal (Digi9652/Digi9636).
-
Asus cards based on AV66/AV100/AV200 chips, that is Xonar D1, DX, D2, D2X, DS, DSX, Essence ST (Deluxe), and Essence STX (II).
-
sound cards compatible with Intel HD audio. These are the most popular sound cards in modern personal computers.
2.3. Native DSD playback with USB sound devices
Unfortunately, the mainline Linux kernel does not support many USB devices in native DSD mode. One reason is that USB audio class specification does not define the DSD format. The short list of supported devices includes:
-
iFi Audio micro/nano iDSD
-
Matrix Audio X-Sabre
-
Matrix Audio Mini-i Pro
-
OPPO HA-1
-
Gustard DAC-X20U
-
DIYINHK DSD DXD 384kHz USB to I2S/DSD
-
JLsounds I2SoverUSB
-
Aune X1S 32BIT/384 DSD DAC
-
PS Audio NuWave DAC
-
Denon DA-300USB
-
Marantz HD-DAC1
-
Marantz SA-14S1
-
USB audio devices made by Playback Designs
There is also a set of experimental kernel patches that add support for more USB devices. The set is available at https://github.com/lintweaker/xmos-native-dsd These patches will be tested and gradually included in further releases of wtfplay-live
2.4. Recommended BIOS settings
2.4.1. General recommendations
There is one BIOS parameter that may impact wtfplay-live performance noticeably. It is High Precision Event Timer (HPET). It is recommended to enable this feature. HPET is enabled by default in the most of modern computer motherboards, but double check your BIOS settings if you are unsure.
Another BIOS setting that may impact the performance is Intel Hyperthreading (HT). Some users report that they achieve better playback quality with HT disabled.
Additionally, it is recommended to disable processor C states and P states.
2.4.2. Built-in sound cards
Most PCs have internal sound cards on their motherboard. If those built-in sound cards are not used, then disabling them in the BIOS will generally bring an improvement too.
Unfortunately, some of the BIOSes do not offer an option to disable the built-in sound cards. If the BIOS in your computer is like that then you can disable the unwanted sound cards at the operating system level by unbinding/detaching the hardware from the kernel driver.
Since version 0.7.1 wtfplay-live comes with the tools that makes this process easy with the new ‘snd’ utility. Please see the details in this section.
To make the process even easier, disabling the unused sound cards has also been added to the interactive flow of wtfsetup utility.
2.4.3. UEFI support
Since 0.6.1 release wtfplay-live supports booting in UEFI mode. Secure Boot is not supported. If you have a problem with UEFI boot please disable the Secure boot feature in your computer BIOS setup program.
2.5. SATA storage devices
wtfplay-live supports SATA/PATA disk controllers that work in AHCI mode. This is usually the default setting in SATA controllers that you can find on most motherboards. The IDE Legacy mode should also work without problems.
In most computer motherboards there are also certain SATA ports that are dedicated for RAID configuration. They are usually routed to a special controller that assists the operating system driver in performing RAID operations. This kind of controllers is typically called Fake RAID and is not supported by wtfplay-live.
If your SATA disks are not detected please make sure that your SATA controller operates in AHCI mode. This is usually done in motherboard’s BIOS setup program.
2.6. Supported file systems
wtfplay-live can access SATA/PATA/USB disks/flash drives with following file systems:
-
ext2, ext3, ext4 (Linux)
-
FAT32/FAT16 (Microsoft DOS and Windows)
-
exFAT (Microsoft Windows, SD cards 32GB+)
-
NTFS (Microsoft Windows, see note below)
-
ISO9960 (CD/DVD)
If you have your media files on a hard drive with one of the file systems above, wtfplay-live will be able to read them.
There is one caveat however. wtfplay-live will not access Logical Volume Manager (LVM) partitions or software RAID configurations.
|
Note
|
There is a small performance penalty when accessing NTFS filesystem under Linux. |
|
Note
|
The support for exFAT has been added in wtfplay-live 0.8. |
2.7. Installation
wtfplay-live does not require installation in the traditional meaning. It is a live Linux distribution.
wtfplay-live is provided as hybrid-ISO image. That means you can burn it on optical disk and you can write it on a regular disk (SATA/USB) without modifications. In other words, you can create Live-CD and Live-USB from exactly the same image.
For detailed installation instruction please see the Installation Guide.
2.8. Booting
During boot wtfplay-live offers a choice of a few Linux kernels. This is done via a small menu. To choose a specific kernel simply highlight it using the arrow keys and press ENTER to boot it.
If the kernel is not selected manually, the default one (first one on the list) will be booted after 5 seconds.
Each kernel may have different impact on overall sound quality. Feel free to experiment and try each of them. The default kernel has been considered the best by majority of early testers, however a group of test participants preferred other (non default) kernels.
After the system is booted you will be logged in automatically as root (system administrator) and a small welcome screen will be displayed. At the bottom of the screen you will see the command prompt:
wtfplay-live #This means that the system is ready for your commands. At this stage you do not need the boot disk either, and if you wish, you can remove/unplug it from your computer. wtfplay-live runs from RAM and accesses local disks in read-only mode. That means all data on local disks are preserved intact.
2.9. Keyboard layout
wtfplay-live by default uses US English keyboard layout. This may
potentially be a problem if you use a keyboard with a different layout. To
change keyboard layout a new keyboard map must be loaded into the Linux kernel
and you can use 321 command for this:
321If the command is run without any parameters it will display the list of the most popular keyboard maps that are available. The maps are displayed as numbered list that is sorted alphabetically.
 1 azerty            2 be-latin1         3 bg-cp1251         4 bg-cp855
 5 bg_bds-cp1251     6 bg_bds-utf8       7 br-abnt           8 br-latin1-us
 9 by               10 cf               11 croat            12 cz
13 de               14 dk               15 dvorak           16 en-latin9
17 es               18 et               19 fi               20 fr
21 gr               22 hu               23 il               24 is-latin1
25 it               26 jp106            27 la-latin1        28 lt
29 mk               30 nl               31 no               32 pc110
33 pl               34 pt-latin1        35 ro               36 ru
37 se-fi-ir209      38 se-fi-lat6       39 se-ir209         40 se-lat6
41 sg               42 sk-prog-qwerty   43 sk-prog-qwertz   44 slovene
45 trf              46 trq              47 ua               48 uk
49 us               50 wangbe
_
51 mac-be           52 mac-de-latin1    53 mac-dk-latin1    54 mac-dvorak
55 mac-es           56 mac-fi-latin1    57 mac-fr           58 mac-it
59 mac-pl           60 mac-pt-latin1    61 mac-se           62 mac-uk
63 mac-us
Below the list you will see the prompt asking you to select the keyboard map. You can choose which map to apply by typing either its number or its name. After confirming with ENTER key the keyboard map will be applied.
The keyboard map configuration will be stored on the persistent storage when possible. In this case the map will be loaded automatically after you restart the system.
Sometimes the keyboard settings cannot be stored, for example because the
boot disk is in read-only mode. In this situation wtfplay-live will assume
the default layout after rebooting. That means, that every time you boot
wtfplay-live you will have to select keyboard map again. In order to
accelerate the subsequent keyboard layout selection you can run 321 in
non-interactive mode and pass the selected keyboard map number or name as a
parameter.
For example, assume that you want to use UK keyboard layout. This map
has number 48 on the list. To apply this map directly you can type:
321 48Alternatively you can type the command with the map name:
321 ukIn both cases above, the keyboard map list will not be displayed.
|
Note
|
321 is a simple utility that is specific to the wtfplay-live. It is
called this way to allow you to change keyboard map using digit keys only.
The digit keys are located in the same place in almost all keyboards. |
If your specific keyboard layout is not listed by 321 tool you may want to
load it manually with the loadkeys command. First you need to find the map
file that you want to load. The map files are located in /usr/share/keymaps
directory and the subdirectories. Once you have located the map file all you
need to do is to pass it as a parameter to the loadkeys command.
As an example let us use the uk layout again. The map file for this layout
is /usr/share/keymaps/i386/qwerty/uk.map.gz. The command to load it is as
follows:
loadkeys /usr/share/keymaps/i386/qwerty/uk.map.gzOr even shorter than that:
loadkeys uk2.10. Sound devices
To check what sound devices are available in your system run snd
command. It will print a table with all sound devices detected by the OS.
The table will look similar to the one below:
ID      CARD   DEV    DESCRIPTION
hw:0,3     0     3    Generic HDMI 0
hw:0,7     0     7    Generic HDMI 1
hw:0,8     0     8    Generic HDMI 2
hw:1       1     0    Generic_1 ALC257 Analog
In the example above you can see two sound cards. The first card has three devices and they are associated with the HDMI outputs. The second card has just single device that is associated with the analogue output.
In general, the identifier for sound devices has format of hw:N,M, where N
is the sound card index and M is the device index within the card. If the
device index is omitted (including comma), then 0 is assumed. In other
words, the identifiers hw:0 and hw:0,0 are equivalent.
The identifier is important as it is needed to invoke the player as well as the UI.
|
Note
|
Older versions of wtfplay-live had an equivalent tool called
snd_scan. That tool is deprecated and will be removed in the future
releases. |
2.11. Volume control
Volume levels can be adjusted with alsamixer command. It is the very basic
tool that is available in most, if not all, Linux distributions.
alsamixer offers a visual interface to adjust hardware mixer controls of
sound devices.
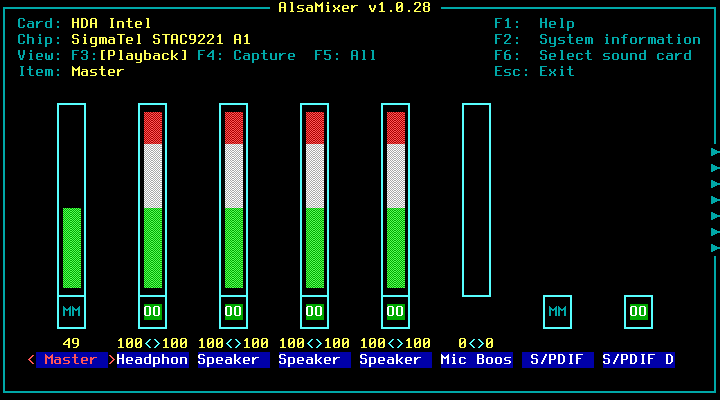
alsamixer is controlled from the keyboard. The basic keys are as follows:
|
ARROW KEYS
|
change mixer control and adjust the level |
|
M
|
mute/unmute selected control |
|
F6
|
selects the sound device |
|
ESC
|
exits to the command line |
|
Note
|
wtfplay-live does not use software volume control. All audio material delivered to the sound hardware is bit-perfect. alsamixer changes the volume controls that are available in your hardware. |
2.12. Access to local disks
The local hard drives, SATA and USB, are available in /media directory. For each of the drives there is a subdirectory there, that is named after the corresponding Linux block device. Inside that subdirectory you will find the contents of your disk/partition.
The above may seem complicated but it is really simple. Let us take a look at few examples:
|
/media/sda1
|
first partition on the first disk drive (SATA or USB) |
|
/media/sda2
|
second partition on the first disk drive (SATA or USB) |
|
/media/sdb1
|
first partition on the second disk drive (SATA or USB) |
|
[path]#/media/nvme0n1p1
|
first partition on the first NVMe disk (PCI/M.2) |
|
[path]#/media/nvme0n1p3
|
third partition on the first NVMe disk (PCI/M.2) |
|
/media/sr0
|
first optical drive (CD/DVD) |
|
/media/sr1
|
second optical drive (CD/DVD) |
|
/media/mmcblk0p1
|
first partition on first multimedia memory card (SD/CF) |
|
/media/mmcblk0p2
|
second partition on first multimedia memory card (SD/CF) |
Whenever you attach a new disk drive to your computer wtfplay-live will automatically mount it (and all partitions that the disk may have) in the /media directory. Similarly, if you remove the disk, then the system will automatically remove corresponding mount directories.
The contents of all disks available in /media directory remains intact at all time. This is because all disks mounted automatically are accessed in read-only mode. Why? This is the no-compromise approach again. There is no need to write anything.
2.13. Checking what disks are mounted
For convenience a small script is provided that displays all disks that are
mounted. It is called mnt. The script prints the disk’s directory, the mode
and the file system. Here is an example:
PATH               MODE   FS
/media/sda1        ro     ext4
/media/nvme0n1p1   ro     ntfs
The mode can have two values: ro stands for read-only and rw means
read-write disk access.
|
Note
|
mnt has been introduced in wtfplay-live 0.7.1. The old utility that
displays the mounted storage is called display_mnt and has been deprecated.
It will be removed in the future. |
2.14. Rebooting and shutting down
There are two ways to restart wtfplay-live. One is with command:
rebootThe other way is by pressing CTRL+ALT+DEL key combination.
To shutdown wtfplay-live you can type either of the following commands:
halt
poweroff
2.15. Persistent configuration
If wtfplay-live is installed on a memory stick or other writeable medium it can save its configuration there. During the first boot a small partition is created on the boot disk for that purpose.
The following items are stored:
-
mixer settings (volume levels)
-
keyboard layout
-
command line history
-
player parameters, such as default audio device, that are configured with wtfsetup utility (see section wtfsetup utility)
-
playlist used by the UI application - wtfcui (see section Using UI below)
The configuration is stored onto the boot disk during system shutdown. If the boot disk is not attached to the PC at that time the configuration will not be preserved. Similarly, the configuration will not be preserved, if the PC is shut down "brutally", either by pressing (and holding) the power button, or by pulling the power plug.
|
Note
|
Persistent configuration has been added in wtfplay-live 0.5. It is not available in previous releases. |
3. The player: wtfplay
3.1. Supported file formats
Currently wtfplay supports only lossless file formats and that list is not long. The supported PCM files are WAV and FLAC with the following parameters:
-
stereo (two channels)
-
16, 24 and 32 bit sample width
-
following sampling frequencies (FS): 44.1, 48, 88.2, 96, 176.4, 192, 352.8 and 384 kHz
The player also support DSF files with stereo DSD material. At the moment single-rate DSD (DSD64) and double-rate DSD (DSD128) are officially supported. Support for higher rates DSD (DSD256, DSD512) is experimental. Please see DSD playback section for details.
Note that some files that use the parameters listed here may not play in your system if the player detects that your hardware does not support certain values. In particular, wtfplay does not change the resolution of your material if that causes information loss, for example it does not convert 24bit samples into 16bit samples.
Similarly, the player does not resample your data. If your sound device does not support FS of the media file, then the player aborts the playback.
There is one more constraint and that is the file size. wtfplay will not be able to play any file that cannot be fully loaded into RAM. In other words, the audio data from the file that you want to play must load into RAM.
This may be a tiny potential issue, but it rarely becomes a real problem. Modern PCs are equipped with large amounts of RAM. 4GB is pretty much a standard now.
If you have a really big file and you are are not sure whether your file will play here is a simple rule to follow: your RAM size must be at least twice as large as the WAV file that you want to play and at least four times larger that the FLAC file size that you want to play.
3.2. DSD playback
By default wtfplay will use DoP encapsulation to play DSD material. This is the most popular and reliable method of DSD playback across audio devices supporting DSD audio. With DoP encapsulation you will be able to play DSD64 and DSD128 material.
3.2.1. Native DSD streaming
The native DSD streaming in wtfplay-live is an experimental feature. For that purpose the extra player binary has been created. It is called wtfplay-dsd.
This player binary has exactly the same set of features as wtfplay and can play both: PCM and DSD material. The only difference is that wtfplay-dsd will use native DSD streaming instead of DoP when possible, that is when the native DSD mode of your sound device is supported by the Linux kernel.
Please see this section to see if your device is supported.
With wtfplay-dsd you will be able to play DSD files up to DSD512.
3.3. Playing music
There are two options to play music. The first option is to run the wtfplay from the command line. An alternative is to use UI called wtfcui. Each method will be covered in subsequent sections.
A big effort was made to make wtfcui very compact and fast, however it is not guaranteed that it will not impact on playback quality. For absolutely best results we recommend using the command line.
3.4. Using command line
3.4.1. Starting and stopping wtfplay
The general format of wtfplay command is as follows:
wtfplay -d DEVICE FILE...where DEVICE is the sound device identifier and FILE… is the path to the single or many files that you want to play.
The device identifier can be obtained with the snd command. It will be
hw:0, hw:0,1, hw:0,2, hw:1 and so on.
Here are some examples with wtfplay. First we will play a single file on the device hw:1, later two files, and all files from the /media/sda1/music directory.
wtfplay -d hw:1 /media/sda1/music/track1.wav
wtfplay -d hw:1 /media/sda1/music/track1.wav /media/sda1/music/track2.wav
wtfplay -d hw:1 /media/sda1/music/track10.dsf
wtfplay -d hw:1 /media/sda1/music/*
Here are two more examples of playing DSD file natively with wtfplay-dsd:
wtfplay-dsd -d hw:1 /media/sda1/music/track3.dsfTo stop the playback press CTRL+C.
3.4.2. Playback navigation
During playback you can navigate through the track that is currently played. Here is the list of keys that can be used along with their actions:
|
SPACE
|
pause |
|
RIGHT
|
seek forward by 5 seconds |
|
UP
|
seek forward by 1 minute |
|
PAGE_UP
|
seek forward by 10 minutes |
|
LEFT
|
seek backward by 5 seconds |
|
DOWN
|
seek backward by 1 minute |
|
PAGE_DOWN
|
seek backward by 10 minutes |
|
Note
|
Playback navigation has been introduced in wtfplay-live 0.6. |
3.4.3. Playing multiple files at once
You can also specify many directories at once and tell the player to load only WAV or FLAC files.
wtfplay -d hw:1 /media/sda1/music/*.wav /media/sda1/new_music/*.flacLinux file names are case sensitive. For example: file.wav and file.WAV are different. Keep this in mind while typing the paths.
Note, that when using asterisk (*) the players will play only WAV or FLAC files. For any other file the players will print message that they failed to load the file and will move to the next file.
Also note, that asterisk wildcard is not recursive. The player will not descend into subdirectories. The best way to illustrate this is with an example. Let us assume we have the following directory structure:
/media/
  +- sda1/
      +- artist/
           +- album1/
           |    +- track_A.flac
           |    +- track_B.flac
           +- album2/
           |    +- track_X.wav
           |    +- track_Y.wav
           + track_Z.flac
If the player is invoked as:
wtfplay -d hw:0 /media/sda1/artist/*Then only track_Z.flac will be played.
3.4.4. Summary of the command line options
wtfplay accepts the following command line options:
| Short form | Long form | Description |
|---|---|---|
|
|
Use NAME as alsa output device. |
|
|
Set priority for RT scheduling. |
|
|
Use N frames per period. |
|
|
Use M periods per buffer. |
|
|
Force sample format S16_LE. See notes below. |
|
|
Force sample format S24_3LE. See notes below. |
|
|
Force sample format S32_LE. See notes below. |
|
|
Print version and exit. |
|
|
Print short help message. |
Notes:
-
When
--s16,--24or--s32option is used, the underlying sound card must support the forced sample format. -
When sample format is forced to S16_LE with the
--s16option, the player will not be able to play neither 24-bit PCM files nor DSD files. -
When sample format is forced to S24_LE the player will be able to play DSD files only in DoP mode.
3.5. Using UI
The UI for wtfplay player is called wtfcui and it will save you some time typing commands. It is designed to be very simple and intuitive.
To start wtfcui you need to know the sound device id that you want to use.
The sound devices are called: hw:0, hw:1, hw:2, and so on. Here is the
command to start wtfcui with hw:1:
wtfcui -d hw:1By default wtfcui will use wtfplay player. If you want to change the
player to wtfplay-dsd you may add -x wtfplay-dsd parameter as follows:
wtfcui -d hw:1 -x wtfplay-dsdThe are also other command line parameters that can be passed to wtfcui. To
see them all run wtfcui --help command.
3.5.1. Main screen
wtfcui provides a very simple and easy to navigate user interface. The main screen is shown below:
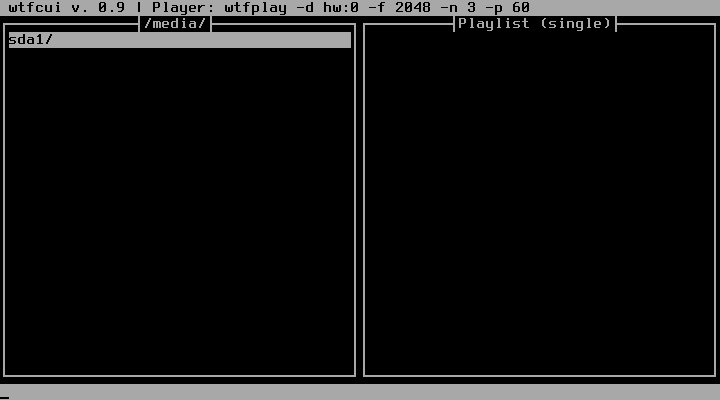
The screen is divided vertically into two panes. Each pane behaves like a menu. You can use UP and DOWN arrow keys for navigation. The PAGE_UP and PAGE_DOWN keys allow quicker navigation - they move the selection bar by the height of the menu. The HOME and END keys highlight the first and last position respectively.
The left pane is a filesystem browser. It allows you to navigate through the local filesystem and it displays only directories and the files that are supported by the player. Currently those are WAV, FLAC and DSF files.
The right pane is the playlist. You start the playback in here.
Only one pane is active at the time. You can switch between panes with TAB or O key.
On top of the screen you will see the player name and the sound device that
wtfcui will be using.
3.5.2. Filesystem browser
To descend to a subdirectory you need to highlight it and press ENTER. To
go to the upper directory you need to highlight ../ entry (the first on the
list) and press ENTER.
To allow smoother navigation through directories a few more keys can be used. Once a directory is highlighted you can descend to it by pressing RIGHT arrow key. Pressing LEFT arrow key or BACKSPACE will always take you to the upper level directory.
With little practice you will be able to navigate very efficiently just using the arrow keys.
The filesystem browser allows you to navigate only within the boundaries of
/media directory - this is exactly where your local disks are mounted.
Once you find the file that you want to play you can add it to the playlist by pressing A key (lowercase a). If you press SHIFT+A (uppercase A) all media files currently displayed will be added to the playlist.
3.5.3. Playlist
The playlist is very simple to operate. Pressing ENTER key starts playback from currently highlighted item to the end of the playlist.
Pressing D deletes the highlighted item from the playlist.
Pressing L toggles the playlist mode between single and repeat.
If you want to randomise items in the playlist you can do it by pressing R.
3.5.4. Playback window
The playback window is shown at the image below:
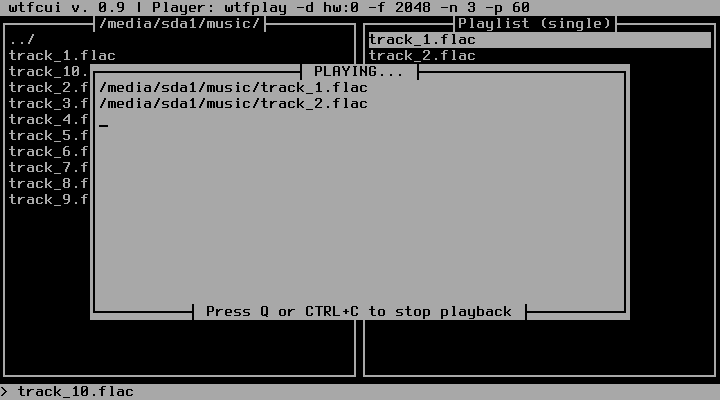
Essentially the playback window is just a list of files that have been played so far. The file that is played currently is displayed at the bottom of this list.
During the playback you can navigate through the currently played track. SPACE key activates/deactivates pause. Keys: RIGHT, LEFT seek forward/backward by 5 seconds, keys UP and DOWN seek forward/backward by 1minute, while keys PAGE_UP and PAGE_DOWN seek forward/backward by 10 minutes.
Keys: < (comma/less) and > (dot/greater) allow you to jump forward and backward through the files in the playlist.
Note, that you cannot play music and browse filesystem or the playlist at the same time. Once playback is started the filesystem and playlist panes are blocked until all files are played or the user interrupts it with Q or CTRL+C key.
|
Note
|
Playback navigation has been introduced in wtfplay-live 0.6. |
3.5.5. Complete list of key bindings
General keys:
|
F1
|
displays help |
|
?
|
displays help |
|
F10
|
quits to command line |
|
SHIFT+Q
|
quits to command line |
Navigation keys:
|
UP
|
highlights previous item |
|
DOWN
|
highlights next item |
|
PAGE_UP
|
moves highlight bar one screen up |
|
PAGE_DOWN
|
moves highlight bar one screen down |
|
HOME
|
highlights first item |
|
END
|
highlights last item |
|
TAB, O
|
switches panes between the file manager and the playlist |
File system browser keys:
|
ENTER (on directory)
|
descents to the highlighted subdirectory. |
|
ENTER (on ../)
|
goes to the upper level directory. |
|
RIGHT (on directory)
|
descends to the highlighted subdirectory. |
|
LEFT
|
goes to the upper level directory. |
|
A
|
adds the selected audio file to the playlist. |
|
SHIFT+A
|
adds to the playlist all audio files from the currently displayed directory. |
|
SHIFT+D
|
adds to the playlist all audio files from the currently highlighted directory. |
Playlist keys:
|
D
|
deletes the selected entry from the playlist. |
|
SHIFT+F
|
clears the playlist. |
|
R
|
shuffles the playlist items. |
|
L
|
toggles playback in loop. |
Playback window keys:
|
CTRL+C, Q
|
stop the playback |
|
SPACE
|
pause |
|
RIGHT
|
seek forward by 5 seconds |
|
UP
|
seek forward by 1 minute |
|
PAGE_UP
|
seek forward by 10 minutes |
|
LEFT
|
seek backward by 5 seconds |
|
DOWN
|
seek backward by 1 minute |
|
PAGE_DOWN
|
seek backward by 10 minutes |
|
>
|
jump to the next position in the playlist |
|
<
|
jump to the previous position in the playlist |
3.6. Playing playlist from the command line with wtfplaylist
wtfplaylist utility allows playing from the command line the most recent
playlist created with wtfcui.
To use the utility, create the playlist in wtfcui and quit to the command line. The playlist will be preserved. To play the preserved playlist type:
wtfplaylistThe utility will use the default player and the parameters that have been configured with wtfsetup (See wtfsetup section for details).
It is also possible to manually specify the player and its parameters manually as the arguments. This is shown in the examples below:
wtfplaylist wtfplay-dsdThe above command will play the current playlist using the wtfplay-dsd
player binary.
wtfplaylist -d hw:1The above command will play the playlist using the default player binary on the second sound card.
wtfplaylist wtfplay-dsd -d hw:1 -f 4096 -n 4In this example, both, the player and its parameters have been specified.
|
Note
|
wtfplaylist has been introduced in wtfplay-live 0.7.3. Similar
functionality in the previous releases can be achieved with the following
command: export IFS=$'\n'; wtfplay $(cat $WTFCUI_PLAYLIST_FILE) |
4. Advanced topics
If you run wtfplay --help you will see the full list
of parameters that can be passed to the player. Apart from obvious parameters,
such as the audio device, there are few that will allow you to tweak the
playback parameters. These are: audio driver buffer size and player’s priority
given to it by the OS.
4.1. Tuning the audio buffer size
Before you start tweaking the audio driver’s buffer size, it is important that you become familiar with a few terms and concepts.
The audio driver’s buffer is is maintained by ALSA’s audio driver in the Linux kernel. It is used to transfer the audio data to the audio interface. This is typically done with help of DMA controller. In other words, the hardware uses this buffer directly. The size of this buffer can be changed by software.
The unit that is used to describe the buffer is the frame. The frame is a group of samples for each channel that should be processed/played at the same time.
The audio buffer is divided into a number of periods of the same size. The size of period is defined in frames. At each period boundary the audio driver asks the player for more audio data.
The relation between sample, frame, period and buffer for stereo data is shown in the drawing below:
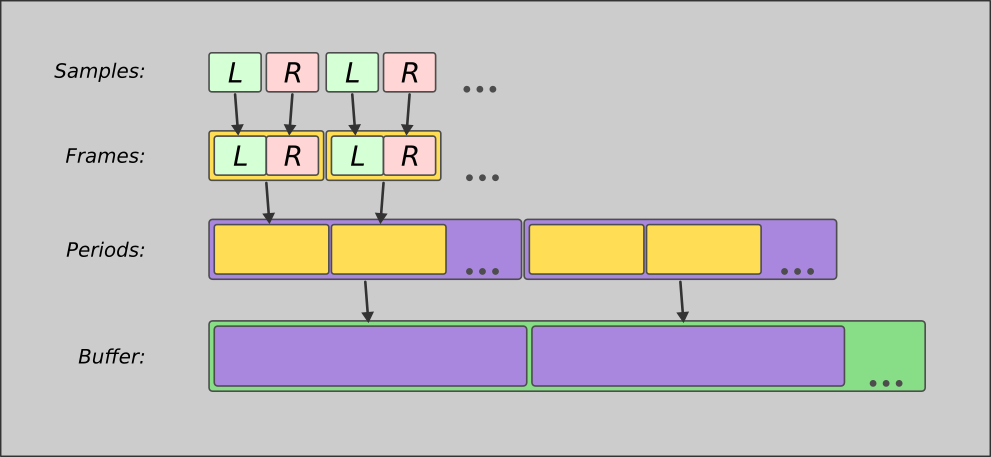
Let us explain the picture above. It shows the stereo data. We can tell that:
-
two samples, one left and one right, make a single frame
-
a number of frames make a single period
-
a number of periods make the full audio buffer
-
whenever the audio driver finishes transmitting a period of data to the audio interface it will ask the player for more data.
As you may notice the total size (in frames) of the audio buffer that is maintained by the ALSA kernel driver is just a multiplication of period size and period count.
Now we know the terminology and we can now learn how to tweak the audio buffer in wtfplay. You can change two things: the period size in frames and number of periods in audio buffer.
Period size can be set by adding -f N or --frames=N command line
parameter, where N is the size of the period in frames. The player requires
that the number of frames is a power of two and is greater than 32. The sample
values are: 32, 64, 128, 256, 512, 1024, 2048 and so on. Any number entered
that is not a power of two will be ignored and the default period size will
be used.
The number of periods can be specified by adding -n M or --periods=M
command line parameter, where the M is the number of periods. The minimum
number of periods is two.
If you do not specify either of the two parameters above wtfplay will use default values that are:
-
period size of 2048 frames (
-f 2048) -
period count of 3 (
-n 3)
Here are some examples of how to use those parameters. In all of the examples
below hw:1 is used as audio device and the file that is played is
/media/sda1/MyMusic/track1.flac.
wtfplay -d hw:1 -f 4096 /media/sda1/MyMusic/track1.flacIn the example above we just change the period size. The period count remains at its default value.
wtfplay -d hw:1 -n 2 /media/sda1/MyMusic/track1.flacHere we changed the period count and we keep the default value of period size.
wtfplay -d hw:1 -f 8192 -n 2 /media/sda1/MyMusic/track1.flacIn this example we changed both parameters and we used the short form of parameters for this.
wtfplay -d hw:1 --frames=8192 --periods=2 /media/sda1/MyMusic/track1.flacIn this example we did exactly the same thing as previously but this time we used long notation to specify the command line parameters.
wtfplay -d hw:1 --frames=8192 -n 2 /media/sda1/MyMusic/track1.flacThat example showed that you can mix short and long notation of the parameters. That has exactly the same effect as before.
Why tweak the audio buffer, you may ask? Are the values not universal? Unfortunately, the answer is no. A particular hardware configuration may simply not support certain values. Furthermore, during initial listening tests, we discovered that the same buffer settings impact sound quality differently on different hardware.
The values really depends on your hardware and, more importantly, on your taste, so discover yourself what values are the best for you. We strongly encourage you to do so as the reward can be worth the effort.
4.2. Tuning the player process priority
wtfplay, as any other Linux processes, runs with a certain priority. In simple terms, the priority tells the Linux kernel scheduler which process to run next. The processes with greater priority will run before processes with lower priority.
The priority of the player can be specified by adding -p N or --rtprio=N
command line parameter, where N is the value between 1 and 99 (inclusive).
Greater value means higher scheduling priority. The default value of
priority is 5.
Here are some examples how to change priority. As previously, we use hw:1
audio device and we play /media/sda1/MyMusic/track1.flac file. We want to
change the priority to 6 and we can use two notations to specify that.
wtfplay -d hw:1 -p 6 /media/sda1/MyMusic/track1.flac
wtfplay -d hw:1 --rtprio=6 /media/sda1/MyMusic/track1.flac
Does setting the higher priority means that it is better? The answer to this question is "No". Specifying priority high enough may mean that the player process is more important than some Linux kernel processes, such as audio driver or USB host controller driver. This is not necessarily a desirable situation. Again, this is something that you will need to discover yourself.
|
Note
|
The priority value of 5 has been introduced as the default in the release 0.7.3. In the previous releases the default priority was 60. During evaluation it has been determined that the new lower value of 5 is generally better. It is recommended to use the new value. |
4.3. Passing player parameters via wtfcui
If you want to use wtfcui, you can still tweak playback parameters. wtfcui
passes some parameters directly to underlying wtfplay. Those
parameters are: period size, period count and priority. Run wtfcui --help to
see them all.
Here are some examples:
wtfcui -d hw:1 -p 6
wtfcui -d hw:1 --rtprio=6
wtfcui -d hw:1 -x wtfplay -p 6 -f 8192 -n 2
wtfcui -d hw:1 -p 6 --frames=8192 --periods=2
Unfortunately, you cannot change those parameters while wtfcui is running. The current release of wtfcui does not support that. That may change in future releases.
4.4. Disabling unwanted sound cards with snd
It is usually beneficial to disable the sound cards that are not used to reduce unnecessary CPU activity. Typically this can be done in the computer BIOS setup program, but some PC BIOS do not allow disabling sound cards.
In wtfplay-live sound cards can be disabled by detaching (unbinding) them from their drivers. In other words the sound card driver can be told to completely ignore the hardware.
This can be easily done with snd unbind CARD command, where CARD is the
identifier of the sound card. It may be specified as a card index (e.g. 1)
or card identifiers like, hw:0 or card0.
For example, to disable the first sound card in the system (hw:0) the
command can be called in one of the following ways:
snd unbind 0
snd unbind hw:0
snd unbind card0
Keep in mind that when the sound cards are disabled using the above method this is not permanent. The cards will be enabled after the system is restarted.
To tell the system to disable the card automatically at the startup use
snd unbind auto command and its subcommands. The example below shows how
do tell the system to automatically disable hw:0 on startup:
snd unbind auto add hw:0You can verify which cards are set up to be automatically disabled with:
snd unbind auto showIf you want to tell the system to disable the sound cards now, rather than at the reboot you can use:
snd unbind auto nowClearing the configuration for automatic card disabling can be achieved with:
snd unbind auto clear|
Note
|
Keep in mind that the configuration for automatic card unbinding is stored on the persistent configuration partition. It will work only if wtfplay-live image is written on a read-write medium. Specifically, it will not work with optical disks. |
5. wtfsetup utility
wtfsetup is a utility that allows you to configure default parameters that will be used by wtfplay and wtfcui application. The parameters are:
-
the default audio device
-
optionally disabling the unwanted sound cards
-
the default player used by wtfcui
-
advanced player parameters: the number of frames per period, the number of periods and the player’s scheduling priority.
After configuration is complete the player will use new values by default. In practice that may save you some time on typing commands. For example, instead of typing:
wtfcui -x wtfplay-dsd -d hw:1 -f 8192 -n 2you could be typing just one word:
wtfcui|
Note
|
Parameter values configured with wtfsetup can be saved onto the boot disk and can be automatically reloaded after the reboot. Please see, the Persistent configuration section for details. |
Typically, a wtfplay-live release contains a number of player binaries, for example wtfplay and wtfplay-dsd. The default player parameters configured using wtfsetup will be used by all player binaries regardless whether they are used via wtfcui or directly from the command line.
wtfsetup tool can be run in two modes: wizard mode and non-interactive mode.
5.1. Wizard mode
In the wizard mode the tool interactively guides you through a series of questions allowing you to define new values of parameters. To start wizard mode run the tool without any parameters:
wtfsetupYou exit the wizard mode at any time by pressing CTRL+C.
5.2. Non-interactive mode
In non-interactive mode, the new values of parameters are defined as a command line parameters. wtfsetup accepts following command line parameters:
| Parameter | Description |
|---|---|
|
Specifies PLAYER as default one in wtfcui. Example:
|
|
Uses DEVICE as the default audio device for the player. Example:
|
|
Sets the default number of frames in the period for the
player. Example: |
|
Sets the default number of periods for the
player. Example |
|
Sets the default process scheduling priority to use by the
player. Example |
|
Attempts to write the specified settings onto the boot disk immediately (without waiting for system shutdown). |
|
Does not check the correctness of parameters. The new values will be accepted without any verification. Use this option with care. |
|
Displays the usage info. |
You can always run wtfsetup -h to see the usage info.
Here is an example of running wtfsetup in non-interactive mode. We will use the sample values from the table above and we will ask wtfsetup to save the parameters to the boot disk immediately:
wtfsetup -x wtfplay -d hw:1 -f 4096 -n 2 -p 10 -wWhen you run wtfsetup for the first time it will use the default values of the parameters, as described in the previous sections. In a subsequent execution wtfsetup will use previously defined values. Let us demonstrate this using the example above. If you run the example and later decide to change priority to 10, you can run wtfsetup like this:
wtfsetup -p 10 -wIn this case, only the priority value will be updated. All other parameters
will remain the same (-x wtfplay -d hw:1 -f 4096 -n 2)
|
Note
|
Sound card disabling is not supported in the non-interactive mode. This
function is managed by the snd tool. Type snd help to see all options. |
5.3. Command line parameters and the default values
The important thing to remember is that command line options always
take precedence over configured default values. Let us assume that we
configured hw:1 as a default audio device for the player. If we run player
like this:
wtfplay /path/to/my/file.flacas you can guess, file.flac will be played on hw:1. If we
decide that we want to temporarily play the file on a different audio device,
e.g. hw:0, we can always use the command line parameter:
wtfplay -d hw:0 /path/to/my/file.flacIn this case the default output device hw:1 will be ignored and hw:0 will
be used instead.
The same principle applies to other player parameters.